Know how directly from the Microsoft 365 mail merge experts
¿Cómo encontrar y eliminar contactos duplicados en Outlook?
Si alguna vez te has encontrado desplazándote por tus contactos, solo para tropezar con la confusa presencia de duplicados, no estás solo.
Imagina que estás redactando un correo electrónico a un colega cuando notas múltiples entradas para el mismo contacto, causando una breve pausa en tu parte más productiva de la tarea.
Frustrante, ¿verdad?
Aquí está lo interesante, una persona promedio envía 24.7 correos electrónicos por día. ¡Ahora, imagina la cantidad de contactos que puedes estropear en esta situación!
Como profesional, un porcentaje significativo de tu valiosa semana laboral podría estar deslizándose debido al dilema de la duplicidad. O incluso peor, tu querido cliente o no recibe tus correos especiales en absoluto o los recibe dos veces y se molesta.
Pero no te preocupes, en este artículo estamos a punto de desvelar los secretos que se encuentran en Outlook, guiándote a través del proceso de identificar y eliminar esos molestos duplicados.
¡Así que, abróchate el cinturón y vamos allá !
7 Razones por las que hay Contactos Duplicados en Outlook
En la gestión de contactos de Outlook, el desconcertante problema de los contactos duplicados a menudo se puede rastrear a muchas razones. Entender las causas raíz es crucial para mitigar eficazmente esta duplicidad digital.
Aquí hay 7 razones clave por las que los contactos duplicados de Outlook pueden infiltrarse en tu libreta de direcciones:
1. Errores de Sincronización
Uno de los principales culpables detrás de los contactos duplicados radica en los errores de sincronización. Cuando sincronizas Outlook con otro dispositivo o aplicación, la información de contacto se actualiza.
Sin embargo, si estos dispositivos utilizan diferentes campos de sincronización durante la creación de contactos, el resultado puede ser la recreación inadvertida de contactos existentes durante la sincronización. Este desajuste en los mecanismos de sincronización puede dar lugar a una maraña de entradas duplicadas.
2. Uso de Múltiples Cuentas
Si bien tener múltiples cuentas de correo electrónico en Outlook puede ser una estrategia organizativa conveniente, también puede ser un terreno fértil para contactos duplicados si no se configura correctamente. Cuando los elementos de Outlook se duplican debido a una mala configuración de múltiples cuentas, la eficiencia prevista puede transformarse rápidamente en una libreta de direcciones desordenada.
3. Importación de Contactos o Fusión de Archivos PST
La función de Importar/Exportar integrada en Outlook proporciona una forma práctica de transferir datos. Sin embargo, si la opción “Permitir que se creen duplicados” no está desactivada durante este proceso, prepárate para la llegada no deseada de contactos duplicados.
Importar contactos o fusionar archivos PST sin la debida diligencia puede inadvertidamente llenar tu libreta de direcciones con entradas redundantes.
4. Agregar Incorrectamente Datos de Contacto Adicionales
El error humano a menudo juega un papel en la historia de la duplicación.
Al agregar nuevas direcciones de correo electrónico o números de teléfono a un contacto existente, el sistema puede guardar esta información como una entrada completamente nueva, resultando en duplicación. Este escenario resalta la importancia de prácticas meticulosas de entrada de datos para mantener la integridad de tu lista de contactos.
5. Crear un Contacto Arrastrando un Correo Electrónico
La conveniencia de arrastrar un correo electrónico a la carpeta de Contactos en Outlook viene con su propio conjunto de desafíos. Cuando se emplea este método, aparece una nueva entrada en la libreta de direcciones.
Sin embargo, si el correo electrónico fue enviado desde una dirección adicional de uno de los corresponsales, el contacto se duplica. Esto subraya la necesidad de un enfoque matizado al usar atajos para crear contactos.
6. Cambios en el Formato de la Información de Contacto
Un cambio en el formato o la estructura de la información de contacto, especialmente durante la sincronización, puede llevar a la creación de entradas duplicadas. Un formato inconsistente entre dispositivos o aplicaciones puede resultar en que Outlook interprete el mismo contacto de manera diferente, lo que resulta en duplicaciones.
7. Fusión Incompleta de Contactos
Al fusionar contactos, procesos de fusión incompletos o erróneos pueden contribuir al fenómeno de duplicación. Si el proceso de fusión no logra reconciliar todos los detalles de contacto relevantes con precisión, puede resultar en la creación de entradas duplicadas.
Cómo Evitar que Outlook Cree Contactos Duplicados
Ahora que has eliminado hábilmente los contactos duplicados de tu Outlook, vamos a fortalecer tu fortaleza digital contra futuras infiltraciones. La clave para mantener una libreta de direcciones organizada radica en el detector automático de contactos duplicados de Outlook.
Sigue estos simples pasos para prevenir la creación de duplicados desde el principio:
1. Navega a la Pestaña de Archivo
Abre Outlook y haz clic en la pestaña “Archivo” ubicada en la esquina superior izquierda de la pantalla. Esto te llevará al menú de Archivo de Outlook.
2. Accede a Opciones
Dentro del menú de Archivo, selecciona “Opciones” que se encuentra al final de la lista. Esto abrirá la ventana de Opciones de Outlook, donde puedes personalizar varias configuraciones.
3. Elige Personas
En la ventana de Opciones de Outlook, busca y haz clic en la pestaña “Personas” en el lado izquierdo. Esta sección alberga configuraciones relacionadas con la gestión de tus contactos.
4. Activa el Detector de Contactos Duplicados
Bajo la sección “Nombres y archivo”, busca la opción que dice “Comprobar si hay contactos duplicados al guardar nuevos contactos.” Marca la casilla junto a esta opción para activar el detector automático de contactos duplicados.
5. Aplica los Cambios
Después de marcar la casilla, haz clic en “Aceptar” en la parte inferior de la ventana de Opciones de Outlook para aplicar los cambios que has realizado.
Y listo!
De ahora en adelante, cada vez que agregues un nuevo contacto con un nombre similar a uno existente o una dirección de correo electrónico idéntica, Outlook levantará la alarma de inmediato. Sugerirá fusionar contactos, ahorrándote el dolor de cabeza de lidiar con duplicados más tarde.
Este enfoque proactivo asegura que tu lista de contactos permanezca como un repositorio bien organizado, libre del desorden de entradas repetitivas.
¿Cómo encontrar contactos duplicados en Outlook?
Ahora sabes cómo prevenirlo. Pero, ¿puedes realmente estar seguro de que no hay contactos duplicados en tu lista?
Aquí tienes una guía paso a paso sobre cómo descubrir y evaluar contactos duplicados utilizando las funciones avanzadas de Outlook:
1. Inicia el Informe de Elementos Duplicados de Outlook
Comienza iniciando la utilidad Informe de Elementos Duplicados de Outlook. Una vez que la utilidad esté activa, haz clic en “Configurar…” para iniciar el proceso de búsqueda de contactos duplicados.
2. Selecciona Carpetas para Examinar
En el menú de configuración, selecciona cuidadosamente las carpetas que deseas inspeccionar en busca de contactos duplicados. Este paso te permite identificar las áreas específicas de tu Outlook donde puede haber duplicados.
3. Configura la Utilidad
Configura la utilidad según tus preferencias. Si deseas verificar cada carpeta seleccionada en busca de duplicados dentro de sí misma, evita activar la opción “Buscar duplicados en carpetas”. Esto asegura un examen enfocado dentro de cada carpeta designada.
4. Especifica el Período de Tiempo (Opcional)
Opcionalmente, define el período durante el cual deseas comparar contactos. Esta función te permite reducir la búsqueda a un marco de tiempo específico, ayudando en una identificación más precisa de las entradas duplicadas.
5. Elige Unidades para el Tamaño de Duplicados
Especifica las unidades en las que deseas ver el tamaño de los duplicados. Esta personalización asegura que el informe se alinee con tus preferencias y proporcione información en un formato comprensible.
6. Campos Personalizados para Comparación (Opcional)
En la pestaña de Contactos, tienes la opción de especificar campos personalizados para comparar e identificar duplicados según ciertos criterios. Esta función avanzada añade un nivel de precisión al proceso de identificación de contactos duplicados.
7. Ejecuta la Utilidad
Con tus configuraciones en su lugar, haz clic en el botón “Ejecutar”. La utilidad analizará rápidamente las carpetas seleccionadas, presentando un informe detallado sobre los contactos duplicados. Puedes guardar este informe como un archivo CSV o copiarlo para integrarlo en otros documentos como Word, Excel, Google Sheets o Google Docs.
Versión avanzada del buscador automático de contactos duplicados en Outlook
Para un enfoque más dinámico, considera la versión avanzada del buscador automático de contactos duplicados en Outlook. Esta versión no solo identifica duplicados, sino que también los marca con campos específicos mientras los deja en sus ubicaciones originales.
El proceso inicial es el mismo:
Inicia la utilidad y haz clic en “Configurar…” para seleccionar las carpetas que deseas examinar en busca de duplicados. > Marca la casilla “Usar campos personalizados para comparar” y selecciona los campos en la pestaña Campos a comparar. Este paso refina el proceso de comparación basado en criterios específicos.
1. Asignar categorías o banderas
En la pestaña General, ingresa los nombres de las categorías que deseas asignar a los duplicados. Alternativamente, puedes marcar los duplicados con una bandera para una fácil identificación.
2. Comparación de carpetas (Opcional)
Elige si deseas buscar duplicados por separado en cada carpeta o comparar contactos en todas las carpetas simultáneamente marcando la opción “Buscar duplicados en todas las carpetas”.
3. Ejecutar la utilidad y guardar resultados
Ejecuta la utilidad y, si es necesario, guarda el informe de resultados de búsqueda. Esta versión avanzada mejora tu capacidad para gestionar duplicados al categorizarlos o marcarlos, agilizando la organización de tus contactos.
2 Maneras de Eliminar Contactos Duplicados de Outlook
Una vez que hayas marcado y separado cuántos duplicados tienes, ¡es hora de eliminar los contactos duplicados de Outlook!
Esto se puede hacer de 2 maneras diferentes y vamos a repasar todas ellas paso a paso.
Estos métodos ofrecen un espectro de soluciones para abordar los contactos duplicados en Outlook, proporcionando flexibilidad según tus preferencias y la escala de duplicación con la que estés lidiando. Elige el método que se adapte a tus necesidades y disfruta de una lista de contactos organizada y sin desorden en Outlook.
1. Eliminar Múltiples Contactos Manualmente Uno a la Vez
Paso 1: Acceder a la Vista de Personas
Haz clic en el ícono de ‘Personas’ en Outlook para acceder a tus contactos.
Paso 2: Elegir la Vista de Teléfono
En el grupo ‘Vista Actual’ en la Cinta, selecciona la vista Teléfono para facilitar el escaneo de tus contactos.
Paso 3: Seleccionar y Eliminar Duplicados
Mantén presionada la tecla Ctrl y haz clic en cada contacto que quieras eliminar. Una vez que todos los duplicados estén seleccionados, presiona Suprimir o Ctrl+D para eliminarlos.
2. Encontrar y Eliminar Contactos Duplicados en Grandes Cantidades
Paso 1: Crear una Nueva Carpeta de Contactos
Haz clic derecho en tu carpeta de Contactos actual y selecciona “Nueva Carpeta.” Nómbrala, por ejemplo, “Duplicados.”
Paso 2: Mover Contactos a la Nueva Carpeta
Presiona Ctrl+A para seleccionar todos los contactos, luego muévelos a la nueva carpeta “Duplicados” (Ctrl+Shift+V para el diálogo Mover a Carpeta).
Paso 3: Exportar Contactos a un Archivo .csv
Usa el asistente de Importar y Exportar para exportar contactos de la carpeta “Duplicados”, eligiendo guardar como un archivo .csv.
Paso 4: Importar Contactos desde el Archivo CSV
Ejecuta el asistente nuevamente, seleccionando “Importar desde otro programa o archivo,” e importa el archivo .csv de vuelta a una nueva carpeta de Contactos, asegurándote de no importar elementos duplicados.
Paso 5: Fusionar Contactos Duplicados
Copia los contactos de la carpeta “Duplicados” de vuelta a tu carpeta principal de Contactos, eligiendo actualizar la información de los duplicados.
Paso 6: Revisar y Eliminar
Revisa y toma decisiones para cada duplicado encontrado durante el movimiento. Después de procesar, puedes eliminar la carpeta “Duplicados.”
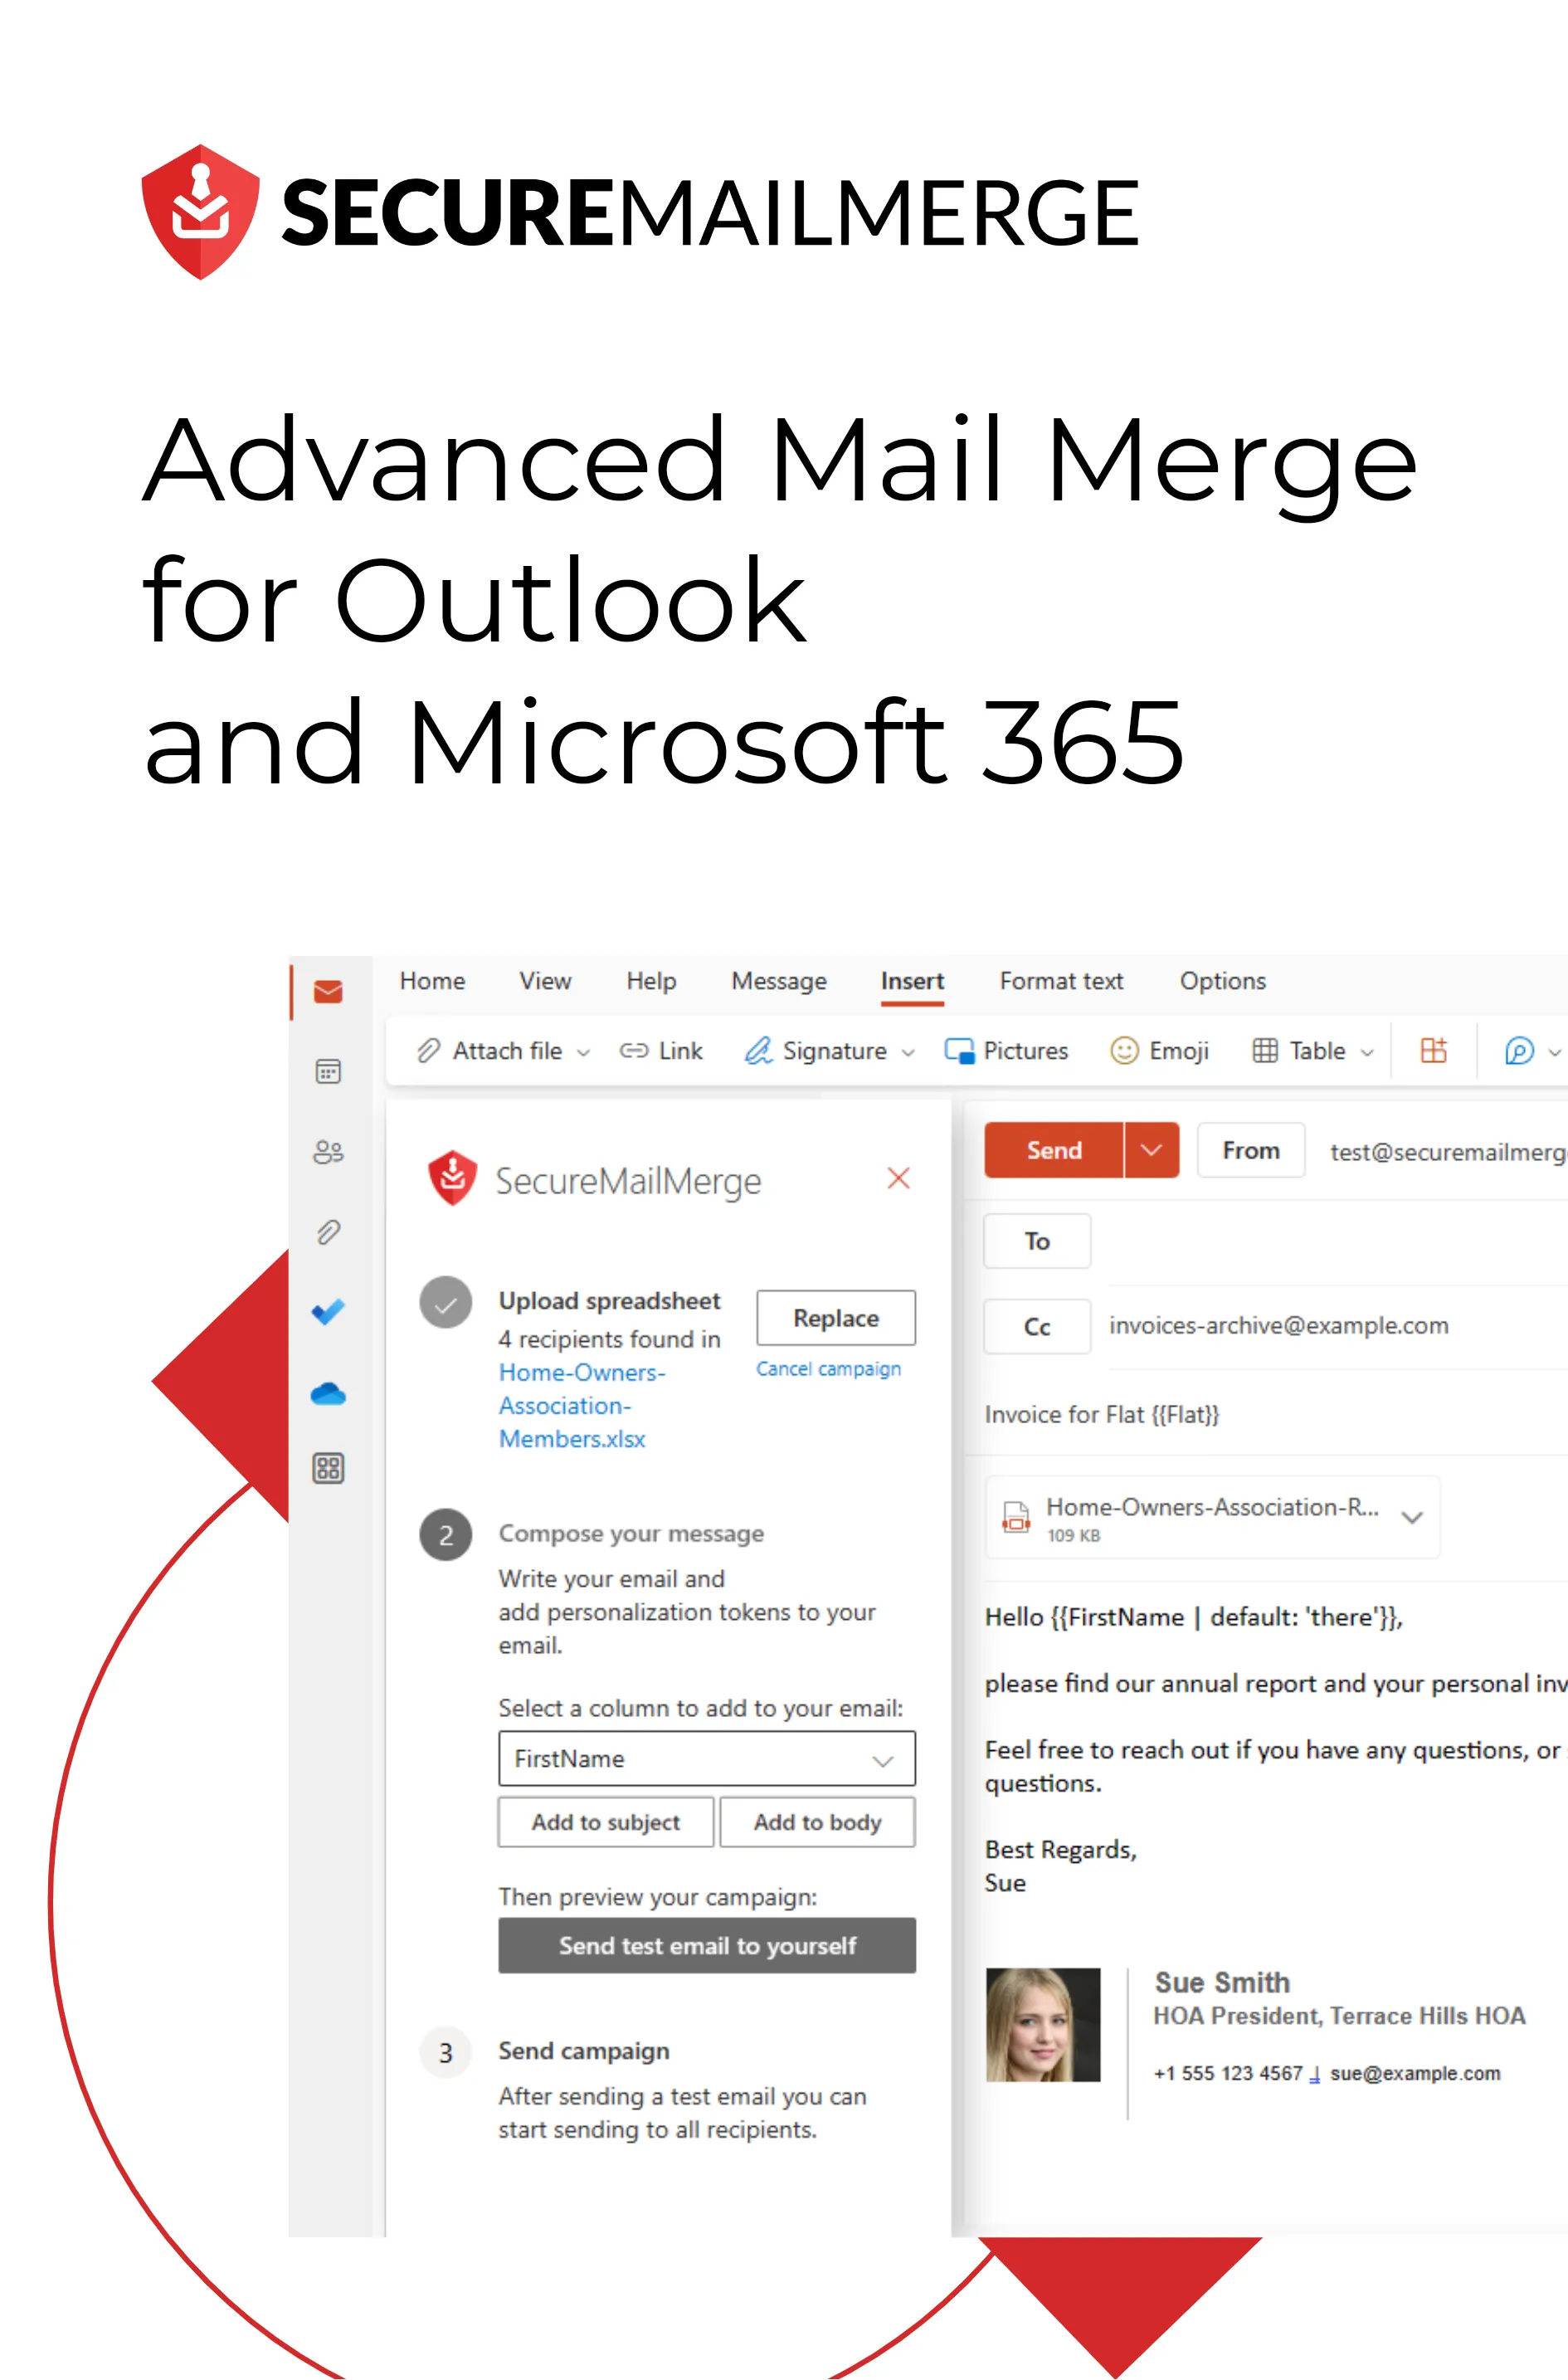
¡Escapa de la lucha con los contactos duplicados en Outlook con SecureMailMerge!
SecureMailMerge, un potente complemento diseñado exclusivamente para Outlook, puede ayudarte a escapar de la lucha por gestionar contactos para enviar correos electrónicos automatizados cada vez para campañas de correo en Outlook. Cubre la necesidad al ofrecer una gama de características esenciales cruciales para automatizar correos electrónicos y obtener tu lista de contactos directamente de las hojas de cálculo donde las almacenas.
Vamos a explorar algunas de estas características en detalle:
-
Opciones de Múltiples Destinatarios
Ya sea que tus contactos estén almacenados en Excel, CSV, TXT, Numbers, tablas HTML, o más, este complemento se conecta sin esfuerzo, permitiéndote llegar a tu audiencia con facilidad. Destinatarios individuales, grupos o listas de distribución: la elección es tuya.
-
Libertad para Personalizar y Escalar
Libérate de las limitaciones mientras el complemento maneja varios tipos de contenido de correo electrónico sin problemas. Envía archivos adjuntos personalizados, crea mensajes complejos, incrusta videos o muestra múltiples imágenes y PDFs: las posibilidades son infinitas.
-
Cifrado de Extremo a Extremo
SecureMailMerge incorpora cifrado de correo electrónico de extremo a extremo en su arsenal. Asegura que la información sensible en tus correos electrónicos automatizados permanezca confidencial. Cumple con las regulaciones de protección de datos y reafirma su compromiso de salvaguardar tus comunicaciones digitales.
Descarga el complemento gratis en App Source y abraza el futuro de la gestión de correos electrónicos con la máxima productividad!
¿Te gustó este artículo?
Tenemos toda una biblioteca de artículos útiles para que leas.
Muéstrame la biblioteca de artículos de Outlook.