Know how directly from the Microsoft 365 mail merge experts
Cómo configurar una firma en Outlook en 7 pasos sencillos
El volumen de correos electrónicos enviados diariamente es asombroso, con casi 347 mil millones de correos electrónicos enviados en todo el mundo cada día, abarcando tanto la comunicación empresarial como la personal.

Este crecimiento exponencial resalta la importancia de hacer que tus correos electrónicos se destaquen y dejen una impresión duradera. Una forma efectiva de lograr esto es utilizando una firma de correo electrónico bien diseñada.
Sin embargo, si eres usuario de Outlook, podrías sentirte perdido al configurar y personalizar tu firma.
Y aunque puedes encontrar varias guías que parecen demasiado técnicas, te cubrimos con 7 pasos simples para crear, agregar y cambiar firmas en Outlook.
En esta guía paso a paso, te guiaremos a través de la configuración de una firma en Outlook y cómo se puede mejorar para que se vea más personalizada y sin complicaciones para tus campañas de correo electrónico con una estrategia profesional.
¡Así que empecemos!
La Importancia de las Firmas de Correo Electrónico
Antes de sumergirnos en los pasos técnicos, hablemos brevemente sobre por qué las firmas de correo electrónico son cruciales.
Una firma de correo electrónico es una tarjeta de presentación digital que proporciona a los destinatarios información valiosa sobre ti o tu organización. Añade un toque personal, mejora el profesionalismo y refuerza la identidad de tu marca.
Una firma bien diseñada también puede incluir detalles de contacto relevantes, enlaces a redes sociales y mensajes de marketing, convirtiéndola en una herramienta poderosa para una comunicación efectiva.
Con cómo las campañas de correo electrónico siguen siendo comunes en la industria digital, ya sea que administres una cuenta de negocio, una cuenta personal como solopreneur, o desees automatizar las despedidas de correo para tu equipo, ¡necesitas hacer que se destaquen con personalización!
5 Beneficios de Agregar una Firma Personalizada
La impresión y la información que tu firma de Outlook puede proporcionar es solo la punta del iceberg. ¡Varios otros beneficios vienen con despedir tus correos de la manera correcta, incluyendo tasas de conversión/respuesta aumentadas!
1. Construyendo Confianza y Credibilidad
Una firma añade un toque de profesionalismo a tus correos, pero ¿por qué es eso bueno?
Para explicarlo mejor, te ayuda a establecer credibilidad y confianza con los destinatarios.
La confianza es una mercancía valiosa en la comunicación por correo electrónico, especialmente considerando la prevalencia de estafas de phishing y spam. Sin embargo, cuando hay una base de confianza con la persona con la que te comunicas, es más probable que seas abierto y receptivo.
Por eso, la mayoría de los correos de negocios llevan despedidas con sus nombres reales/nombres de marca, cargos, información de contacto y otro contenido valioso para el destinatario. Estos suelen estar relacionados con asuntos comerciales críticos.
2. Aumento de Ingresos
Investigaciones realizadas por Marq (Lucidpress) indican que una marca consistente puede aumentar los ingresos en un 33% en todos los canales de comunicación. Incluir el logo y los colores de tu empresa crea una imagen de marca consistente, reforzando el reconocimiento y la recordación de marca.
3. Mejor Tasa de Respuesta
Tu firma puede mostrar detalles de contacto esenciales como tu nombre, título de trabajo, número de teléfono y sitio web, facilitando que los destinatarios se pongan en contacto contigo.
Una encuesta realizada por HubSpot encontró que incluir información de contacto en las firmas de correo electrónico puede llevar a un aumento del 32% en la respuesta de correos electrónicos. ¡Ahora, con más ingresos y respuestas, puedes sumar los números para ver por qué es crucial!
4. Más Oportunidades de Marketing
Tratar tu firma de correo electrónico como más que un simple medio para compartir detalles de contacto puede aumentar significativamente su valor. Al incorporarla en tu estrategia de marketing por correo electrónico ganadora, tu firma de correo se convierte en un canal de marketing adicional.
Este enfoque te permite aprovechar el potencial de tu firma para promover tu marca, compartir mensajes de marketing y conectar con tu audiencia de manera dirigida e impactante.
5. Asegurando Cumplimiento Legal
Dependiendo de tu industria, ciertos requisitos legales pueden exigir incluir información específica en tu firma de correo electrónico, como avisos legales u opciones de exclusión.
Asegurar el cumplimiento de estas regulaciones protege tu negocio de posibles problemas legales y multas. Por ejemplo, industrias como la financiera y la de salud a menudo requieren avisos para cumplir con regulaciones de privacidad y seguridad.
Consejo profesional
Si bien configurar una firma manualmente funciona, usar herramientas de automatización de correo electrónico es la forma más efectiva de asegurar que tus despedidas de correo se agreguen a todos los correos para fines de marketing y cumplimiento.
Cómo configurar una firma en Outlook – 7 pasos sencillos
Ahora, vamos a sumergirnos directamente en los pasos prácticos sobre cómo configurar una firma en Outlook. Primero, veamos cómo hacerlo en las versiones modernas de Outlook (Nuevo Outlook) y en la Web. Más abajo encontrarás las instrucciones para el Outlook Clásico.
Nuevo Outlook y Outlook en la Web
Paso 1: Acceder a la configuración de Outlook
Para el “Nuevo Outlook” en el escritorio y para Outlook en la Web, haz clic en “Configuración” en la parte superior de la página de Outlook y selecciona “Ver toda la configuración de Outlook.”

Paso 2: Navegar a la firma de correo electrónico
En el menú de configuración, elige “Correo” y “Redactar y responder.” Esta página mostrará todas las configuraciones para una firma de correo electrónico.
Paso 3: Introducir tu firma
Bajo “Firma de correo electrónico,” selecciona “Nueva firma,” escribe la firma que deseas y utiliza las opciones de formato disponibles para personalizar su apariencia.
También puedes agregar una imagen de tu firma aquí o copiar y pegar una diseñada con antelación.
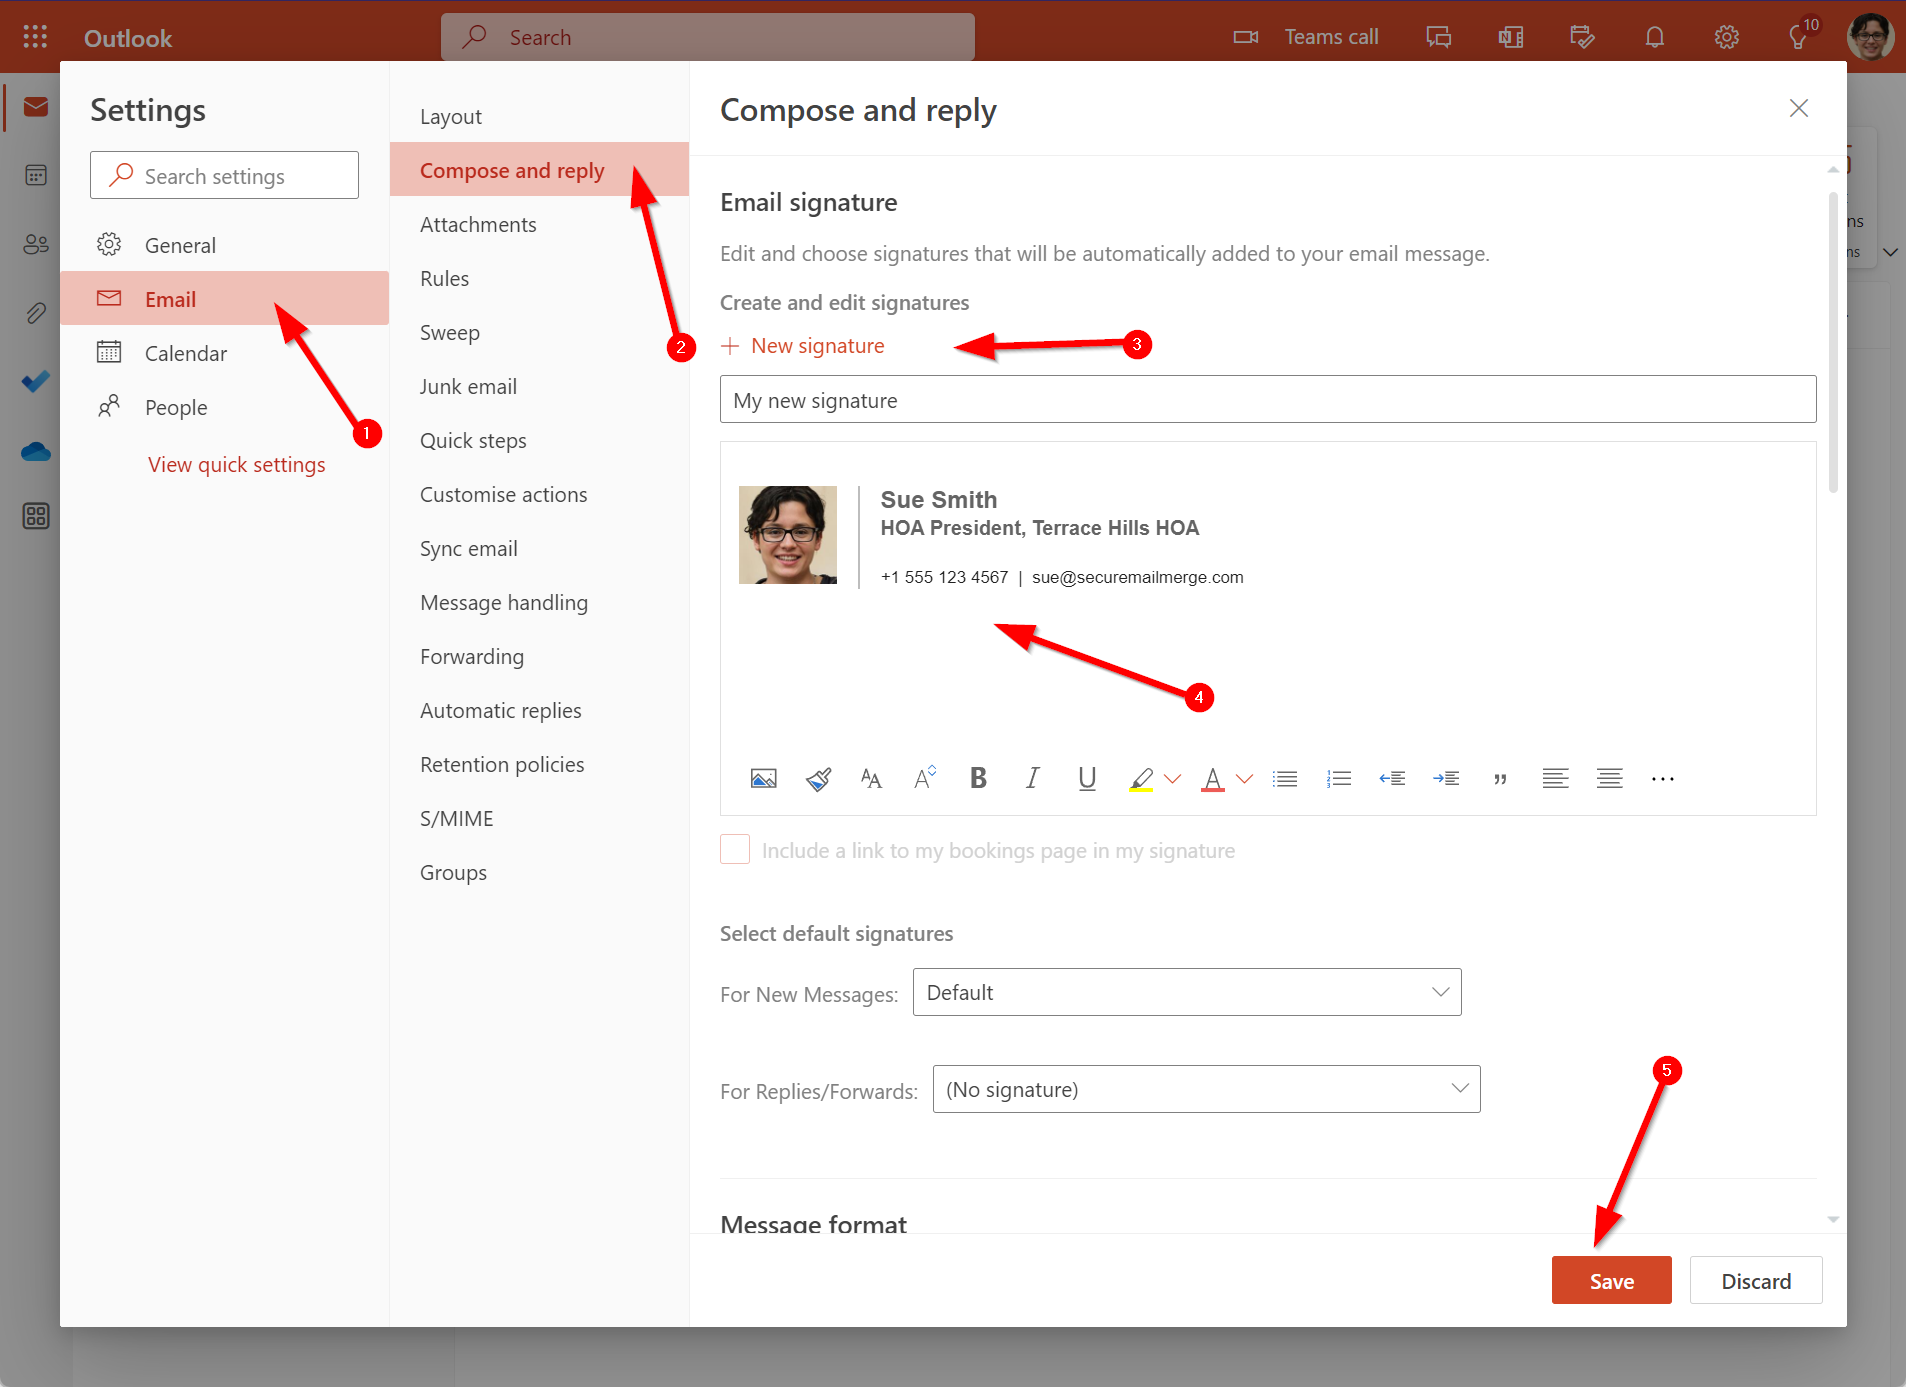
Recuerda hacer clic en Guardar antes de continuar.
Paso 4: Incluir automáticamente la firma en nuevos mensajes
Si deseas que tu firma aparezca al final de todos los nuevos mensajes de correo electrónico, activa la opción “Incluir automáticamente mi firma en nuevos mensajes que redacto.”
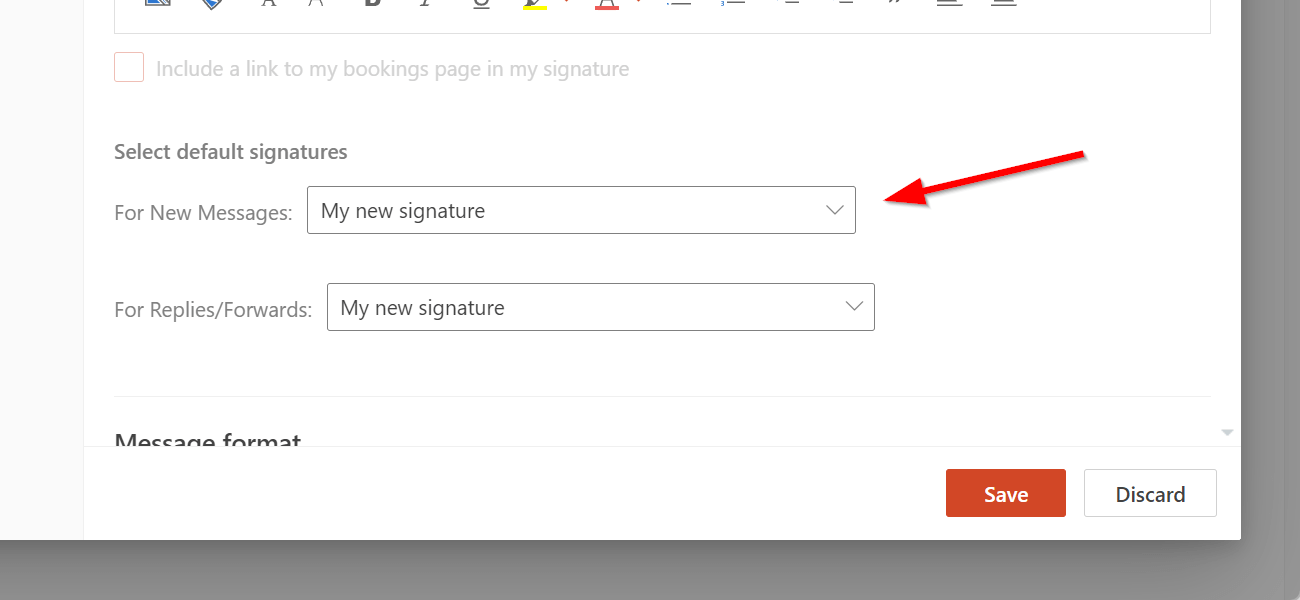
Paso 5: También agregar la firma automáticamente en mensajes reenviados o respondidos
Si deseas que tu firma aparezca en mensajes reenviados o respondidos, activa la opción “Incluir automáticamente mi firma en mensajes que reenvío o respondo.”
Paso 6: Agregar manualmente a mensajes específicos
Si usas un correo electrónico personal y prefieres agregar tu firma manualmente para mensajes específicos, deja las opciones de inclusión automática sin marcar.
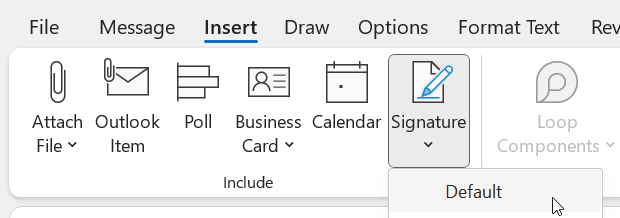
Luego puedes agregar la firma manualmente usando el menú al redactar nuevos correos electrónicos, ver más abajo.
Paso 7: Guardar tus cambios
Una vez que hayas terminado de crear tu firma de correo electrónico y seleccionar las opciones deseadas, haz clic en “Guardar” para guardar tus configuraciones.
Nota: Siempre puedes volver a la página de configuración “Redactar y responder” para modificar la inclusión automática de tu firma, hacer ediciones en el formato y diseño, o cambiar la información.
Outlook Clásico en el Escritorio
Paso 1: Acceder a la configuración de Outlook
Para versiones más antiguas de Outlook en el escritorio, haz clic en el menú Archivo, luego ve a Opciones en la parte inferior.
Paso 2: Navegar a Firmas
En la ventana que aparece, haz clic en Correo y luego en el botón Firmas a la derecha.
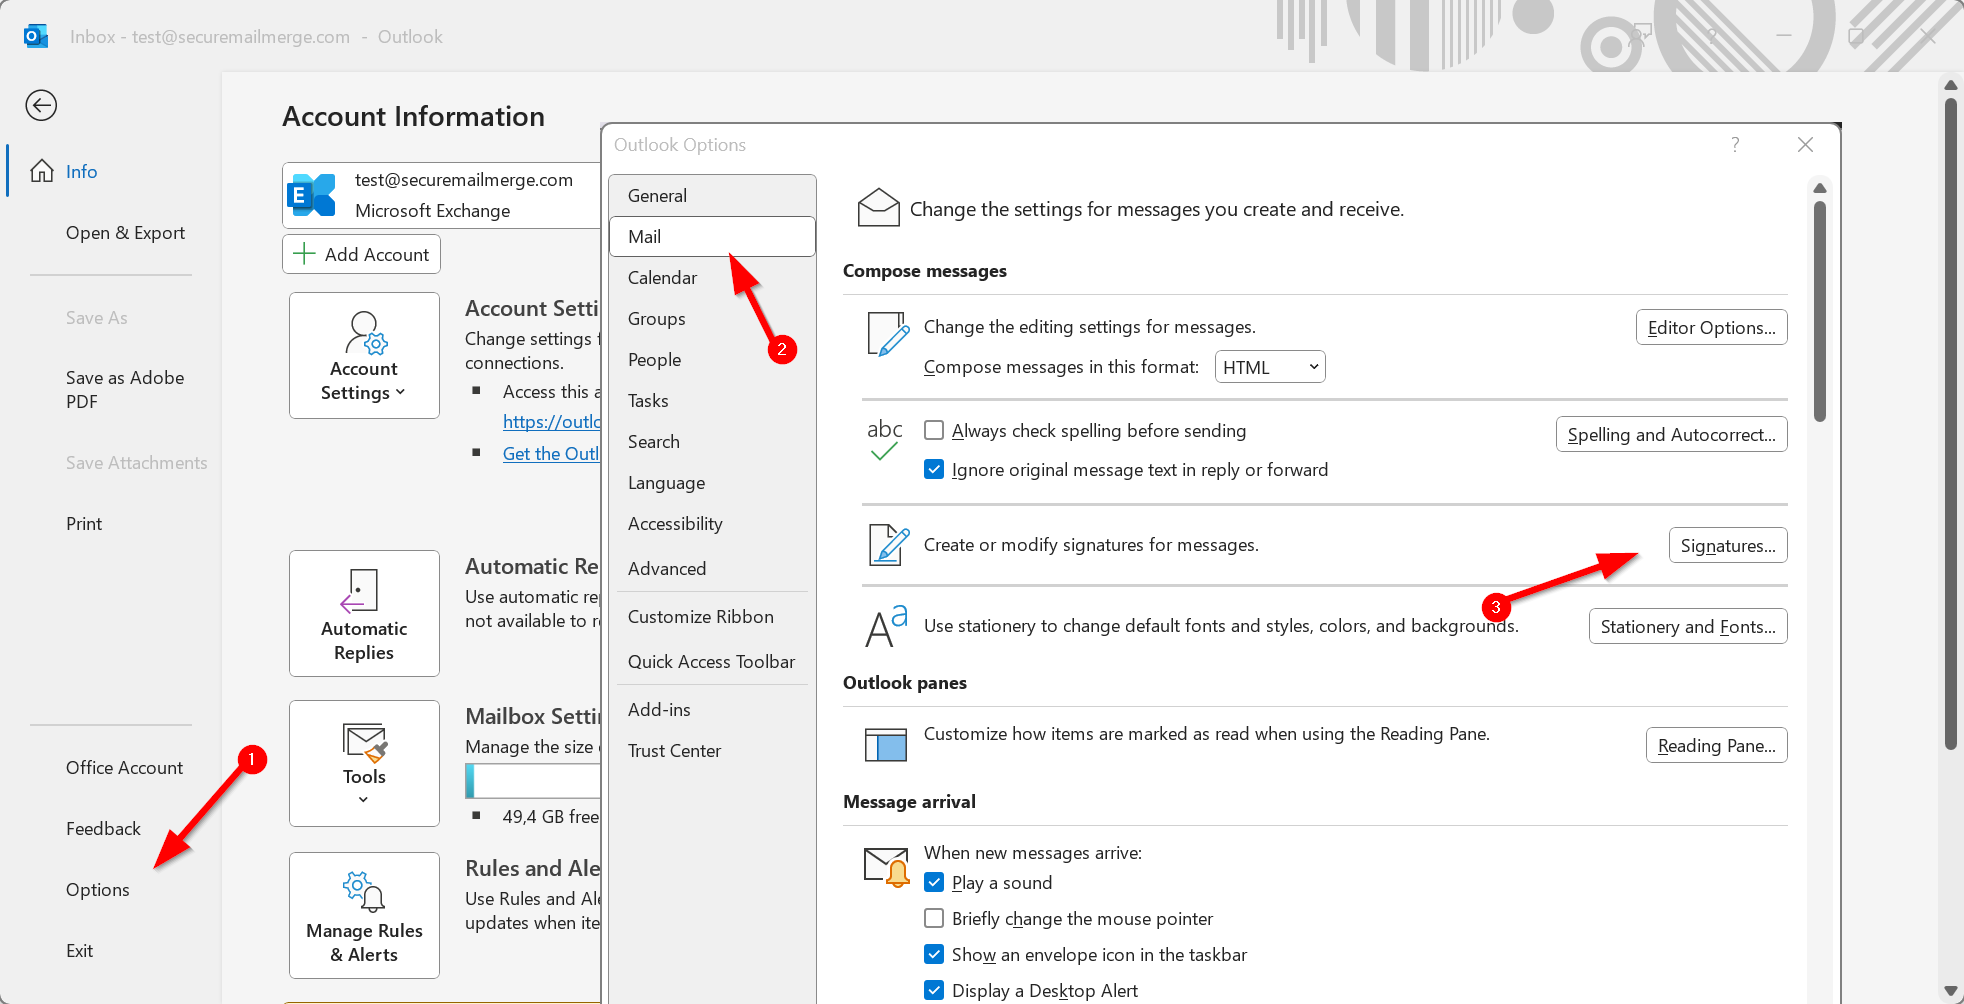
Paso 3: Introducir tu firma
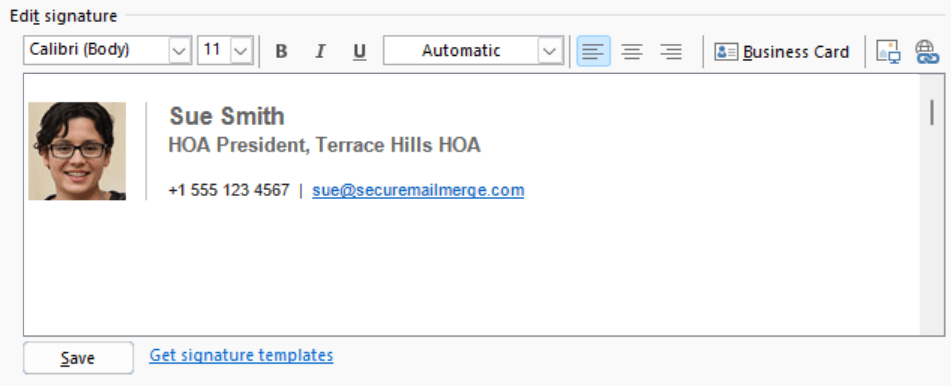
Bajo “Firma de correo electrónico,” selecciona “Nueva,” escribe un nombre para tu firma.
Luego, en el campo de abajo, puedes establecer tu firma, usar las opciones de formato disponibles para personalizar su apariencia y agregar imágenes. Si lo deseas, puedes simplemente copiar y pegar una imagen de firma desde un programa de edición de imágenes o copiar y pegar una desde un editor de firmas.
Paso 4: Inclusión automática en nuevos mensajes
En la sección debajo del editor de firmas titulada “Elegir firma predeterminada,” puedes seleccionar tu nueva firma en el menú desplegable junto a “Nuevo mensaje.” Esto la incluirá en todos los nuevos mensajes.

Paso 5: Inclusión automática en mensajes reenviados o respondidos
También puedes hacer lo mismo para respuestas y mensajes reenviados si lo deseas en el segundo menú desplegable.
Paso 6: Agregar manualmente a mensajes específicos
Si dejas ambos menús desplegables configurados en “(ninguno),” aún puedes agregar firmas manualmente desde el menú cuando escribes correos electrónicos, ver más abajo.
Paso 7: Guardar tus cambios
Una vez que hayas terminado de crear tu firma de correo electrónico y seleccionar las opciones deseadas, haz clic en “Guardar” para guardar tus configuraciones.
Nota: Siempre puedes volver a la página de configuración “Redactar y responder” para modificar la inclusión automática de tu firma, hacer ediciones en el formato y diseño, o cambiar la información.
Cómo agregar una firma a un solo Outlook manualmente
Supongamos que ya has creado una firma pero la has dejado fuera de todos los mensajes salientes. En ese caso, puedes agregarla manualmente al redactar un mensaje de correo electrónico siguiendo estos pasos:
1. Abre un nuevo mensaje
Ve a tu bandeja de entrada y elige “Nuevo mensaje” para redactar tu correo electrónico.

2. Inserta tu firma
Escribe tu mensaje y selecciona “Más acciones” seguido de “Insertar firma” en la parte inferior del panel de redacción. Tu firma se añadirá al correo electrónico.
Si quieres una versión diferente de tu firma en un correo específico, también puedes agregarla manualmente después de cambiar el formato en la configuración de “Redactar y responder”.
3. Envía tu correo electrónico
Una vez que tu mensaje de correo electrónico esté listo, revísalo y elige “Enviar” para enviarlo con tu firma incluida.
Mail Merge Seguro – Mejorando y Automatizando tus Campañas de Email en Outlook
Mientras que Outlook ofrece funcionalidad básica de firma, puedes elevar tus campañas de email con el plugin Mail Merge Seguro. Esta poderosa herramienta se integra a la perfección con Outlook y ofrece varios beneficios además de firmas automatizadas únicas:
- Envía correos electrónicos personalizados desde tu cuenta de Microsoft 365, una hoja de cálculo o tus contactos.
- Envía archivos grandes, mensajes largos, videos o múltiples imágenes sin restricciones.
- Agrega facturas personalizadas, informes a medida o archivos adjuntos únicos por destinatario.
- Envía tantos correos electrónicos como tu cuenta de Microsoft 365 soporte—sin límites en ningún plan.
- Haz que tus correos electrónicos se sientan personales utilizando celdas de tu hoja de cálculo y personalizando cada correo enviado en masa.
- Agrega tablas, imágenes y otros elementos de formato que ya conoces de Outlook. Mejora el atractivo visual de tus correos electrónicos.
- Aumenta el compromiso, ahorra tiempo y maximiza el potencial de tus correos electrónicos de Outlook.
- …y por supuesto, soporta firmas de Outlook desde el primer momento.

Instalar MailMergeSeguro es muy fácil, sin importar tu sistema operativo — Windows, Mac o Web. Sigue estos pasos para encontrar e instalar el plugin de la Tienda de Complementos de Office (AppSource).
Descarga MailMergeSeguro Gratis y lleva tus campañas de email al siguiente nivel.
¿Te gustó este artículo?
Tenemos toda una biblioteca de artículos útiles para que leas.
Muéstrame la biblioteca de artículos de Outlook.